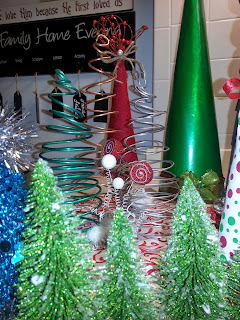
Today is Monday November 18th 2013 and there are only
36 days until Christmas!
ARGH!!!
I'm behind on figuring what to get as Gifts this year, but as you can see from the
Medley of Christmas Trees, the Decorations are somewhat covered.
(Only because I have to teach a craft class on making Christmas Trees)
I won't be posting for every tree I made, I have done a post for the
'Whimiscal Trees', &
'Book Pages Christmas Tree', which are in this picture. As for the others I will just give you a general run down on 'how I made them'.
Green Cone Tree
First I made a template for a large cone and smaller cones. I also used small polystyrene cones from the dollar store.
This Cone Tree, I made by rolling up poster board to make a cone, hot gluing it in place, then wrapped it with Green Wrapping paper, gluing it in place with Mod Podge. Finished it off with a decoration I got from Walmart for $2 and some dollar store Christmas ribbon around the bottom.
Wood Popsicle Cone Tree

This
Popsicle Craft stick, took a little longer to make, as I had to layer on the sticks.
I made another poster board cone, from the template. Then starting from the bottom I glued the sticks on. The first bottom layer I just stuck side by side, I didn't stagger them on top of each other.
For the second layer, I did stagger them to overlap. Keep doing this till you have the effect you want. I used 1 large bag of popsicle craft sticks & 1 small mini bag of popsicle craft sticks.
Then using a rag and small paint brush, I applied a wood stain all over and let it dry. Once dried I glued and stuck in a decoration I got from the dollar store.

Fun Clown Hat Christmas Tree
For this tree, I used a polystyrene cone, ribbon, piece of Christmas fabric, glue gun, a button, a block scrap of wood, Mod Podge and a decoration for the topper.
All I did for this tree, I glued the cone then stuck the fabric over it. On the underside I glued ribbon on, making loops as I went. Then I cut and made smaller green loops and stuck those down and on top of the green ribbon. With the block of wood, I glued a piece of ribbon around the edge, then glued the whole cone to that. Then poked a hole in the top of the cone, popped some glue down the hole, then stuck the topper in. Add a ribbon and a button.
Button Tree.
For this tree,I used a small block of wood, an unfinished wood tree, I purchased from Walmart for $1.50, Bags of Buttons from Walmart about $2.50? Glue Gun, spray glue, Glitter, Ribbon.
First I glued the tree to the block of wood. Then I gave the tree a coat of spray glue and just to be safe I used my glue gun as well to glue each button on, overlaying buttons to fill in gaps. For the topper, I used red buttons and ribbon.
Spray the whole tree with spray glue, then spinkle glitter all over. Tap off the excess and leave to dry.
Burlap Cone Tree
To make this I made a cone from poster board. A large wooden spool, scrap wood, twine, red burlap, a $2 red topper from Walmart, a thick peice of card ( I used an old book cover) glue gun & glue.
Wrap and glue your burlap to your cone. Glue your thick card/book cover to the underside of cone, hold till set. Glue the wooden spool to the scarp wood, then glue the cone to the spool, hold till set. Next use a line of glue to hold the start of the twine onto the wooden spool, wrap around, use glue to secure.
Add twine & bow around the bottom and top. then Glue the end of the topper & then stick down into your cone.


.jpg)


.jpg)


.jpeg)