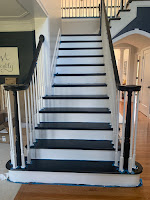
When we purchased our stunning brick 6558 sq ft Colonial in Laytonsville, Maryland In Nov 2021 Jason and I knew we'd have our work cut out for us.
Not only does our fabulous home set on 1.25 acres right next to state woodland with mature trees galore, grass, and flower beds that always seem to grow exponentially every second! Also, the house is 20 years old, and that all-the-rage lovely pine-ish orange cabinets, hardwood floors, and yes, stairs... Can I say it needs updating!
UPDATING
And that, my friends, is where my tale begins lol
So, how do you eat an Elephant?
One piece at a time.
and that is how I'm tackling our home - one piece, one room, one project at a time with, and might I add, I have to take breaks in between to recover as I now realize my 51 yr old body and bones are crying out with - 'hey, Helen, you've not got an 18 yr frame anymore' LOL and as much as my inner Helen mindset someday thinks I still have, I don't LOL
To date, I've updated the pantry, mudroom/laundry, girls' bathroom - which is still needing the vanity redo, guest bedroom & primary bedroom, the sunroom, added curtains throughout, paint, and now the stairs. We also had all the doors and hardware replaced. We have all-new lighting fixtures in boxes in our formal waiting to be installed as well as all-new still boxed GE Cafe stainless steel appliances in the garage and next month the kitchen will get ripped out and redone! Eek.... Then, once that is done, then it gets even more, messy/dusty - tearing out the hardwood and replace with some gorgeous java color new hardwood flooring.
Back to the stairs! Now our stairs aren't a small regular sized one - HECK NO! And not one that I'm used to but instead we have a gallery landing and split stairs, the main and kitchen stair. All with plenty of white spindles and all that orange pine-ish treads, base, and handrails.
First, I set out to find a blog that had already done this task lol * Make it - love it blog*and I found one that I showed to Jason and I said, this I can do and it will save us thousands of dollars - as we had discussed initially replacing the lot. But instead, it cost us a tad over $200 and a lot of my time and elbow grease. *( 4 weeks worth of some full days from 10am - 7 pm with only the break to make dinner)
Mind you, our stairs are large and not everyone's will cost that much to stain if you only have one to redo :)
Here she is! Isn't she lovely! My heart leaps every time :)I knew tackling the stairs would be quite the job, but gosh... 4 weeks worth! From tearing up the carpet, first, pulling all the staples and nails, scraping off old dollops of paint and gunk, and then filling all those tiny holes and making sure all the stair treads were ready to stain.
ALL THE BEFORE FROM HOW THE PREVIOUS OWNER HAD IT - FROM ZILLOW POSTING


.jpg)


.jpg)


.jpeg)

No comments:
Post a Comment